Essa é uma revisão anterior do documento!
Formatador de Relatório - ReportBuilder (Resumo do guia do desenvolvedor)
TUTORIAL DE RELATÓRIOS - B - C
1. Click the 'SubReport1' tab at the bottom of the designer.
Note: The selected object in the Object Inspector will change to ppChildReport1. The subreport component is a container for the child report. The subreport controls the properties that direct the print behavior of the report. The subreport also controls the report's relationship to other components within the main report layout. The child report contains the actual report layout (bands, labels, etc.) and is accessible via the Report property of the subreport component (i.e. SubReport1.Report).
2. Place a shape component in the left side of the title band.
3. Use the Draw toolbar to set the Fill and Line color of the shape to Navy.
4. Right click over the shape to display the popup menu. Select the ParentHeight and ParentWidth options. The shape will resize and cover the entire band.
5. Click the Layout tab at the bottom of the Data Tree and configure the drag-and-drop settings:
1. Clique na aba 'SubReport1 “na parte inferior do designer.
Nota: O objeto selecionado no objeto Inspector mudará para ppChildReport1. O componente sub-relatório é um recipiente para o relatório criança. O sub-relatório controla as propriedades que direcionam o comportamento de impressão do relatório. O sub-relatório também controla o relacionamento do relatório a outros componentes dentro do layout do relatório principal. a criança relatório contém o layout actual relatório (faixas, etiquetas, etc.) e é acessível através da propriedade Relatório do componente sub-relatório (ou seja SubReport1.Report).
2. Coloque um componente em forma o lado esquerdo da banda título.
3. Use a barra de ferramentas Desenho para definir o preenchimento e cor da linha da forma para Marinha.
4. Clique com o botão direito sobre a forma para exibir o menu pop-up. Selecione as opções ParentHeight e ParentWidth. A forma irá redimensionar e cobrir toda a banda.
5. Clique na guia Layout na parte inferior da árvore de dados do e configurar as definições de arrastar-e-soltar:
Create All
Style Tabular
Label Font Name Times New
Label Font Style Bold
Label Font Size 12 point
Label Font Color White
Field Font Name Times New
Field Font Style Regular
Field Font Size 10 point
6. Click the Data tab at the bottom of the Data Tree and select the plOrder data pipeline.
7. Use the Ctrl-click method to select these fields:
6. Clique na guia Dados na parte inferior da árvore de dados do e selecione o pipeline de dados plOrder.
7. Use o método a tecla Ctrl pressionada para selecionar estes campos:
OrderNo
SaleDate
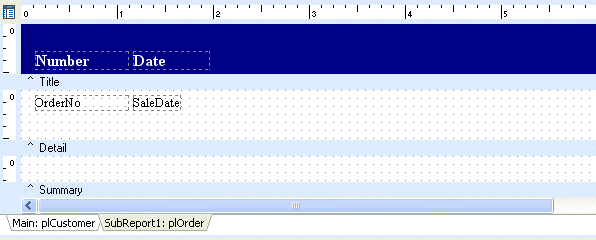
8. Drag the selected fields into the title band, positioning the mouse at the bottom left corner of the shape. Release the mouse button to create the components.
9. Hold down the Ctrl key and use the arrow keys to position the selection:
8. Arraste os campos selecionados para a banda de título, posicionando o mouse no canto inferior esquerdo da forma. Solte o botão do mouse para criar os componentes.
9. Mantenha a tecla Ctrl e usar as teclas de seta para posicionar a seleção:
Left 0.1458
Top 0.2813
10. Set the label captions to Number and Date.
11. Left justify all of the components.
12. Right-click over the SaleDate DBText component and set the DisplayFormat to 'mm/dd/yyyy'.
Note: The Display Format dialog automatically checks the data type of the component and displays a list of appropriate formats.
13. Set the width of the Date label and the corresponding DBText component to 0.8.
14. Select the DBText components and move them to a top position of 0.0521.
10. Defina as legendas rótulo a quantidade e data.
11. Esquerda justificar todos os componentes.
12. Dê um clique direito sobre o componente SaleDate dbText e definir o DisplayFormat para “mm / dd / aaaa”.
Nota: A caixa de diálogo Formato de exibição verifica automaticamente o tipo de componente de dados e exibe uma lista de formatos adequados.
13. Ajustar a largura do rótulo Data e o componente correspondente dbText a 0,8.
14. Selecione os componentes dbText e movê-los para uma posição de topo de 0,0521.


